Uncategorized
Balcony Solar System Installation (Bracket Version)
Are you still concerned about the perceived complexities of installing solar panels on your balcony railing? Do you feel overwhelmed and believe that you require expert assistance? Well, let us put your worries to rest. Installing solar panels on your balcony railing is actually incredibly easy.
Table of Contents
- Packing List for Balcony Solar System Installation
- Step 1: Unpacking the Packages
- Step 2: Mounting the Solar Panels
- Step 3: Installing the Z-Shaped Brackets
- Step 4: Securing the Solar Panels to the Balcony Railing
- Step 5: Connecting the Cables and Micro Inverter
- Step 6: Placing the Micro Inverter
- Step 7: Finalizing the Installation
- Conclusion
- Frequently Asked Questions (FAQs)
2. Packing List for Balcony Solar System Installation
Before we dive into the installation process, let’s gather the necessary equipment and materials. Here’s a packing list to help you get started:
- 400w micro inverter * 1
- 200w solar panels * 2
- MC4 Cables *2 (for solar panels and E400)
- AC power connecting cable *1
- Mounting Bracket for Solar Panels*1
- screw pack * 1
Now that we have our tools ready, let’s move on to the installation steps.
3. Step 1: Unpacking the Packages
Begin by opening the packages containing the solar panels, micro inverter, cables, and other accessories. Ensure that you have received all the components listed in the packing list.

4. Step 2: Mounting the Solar Panels
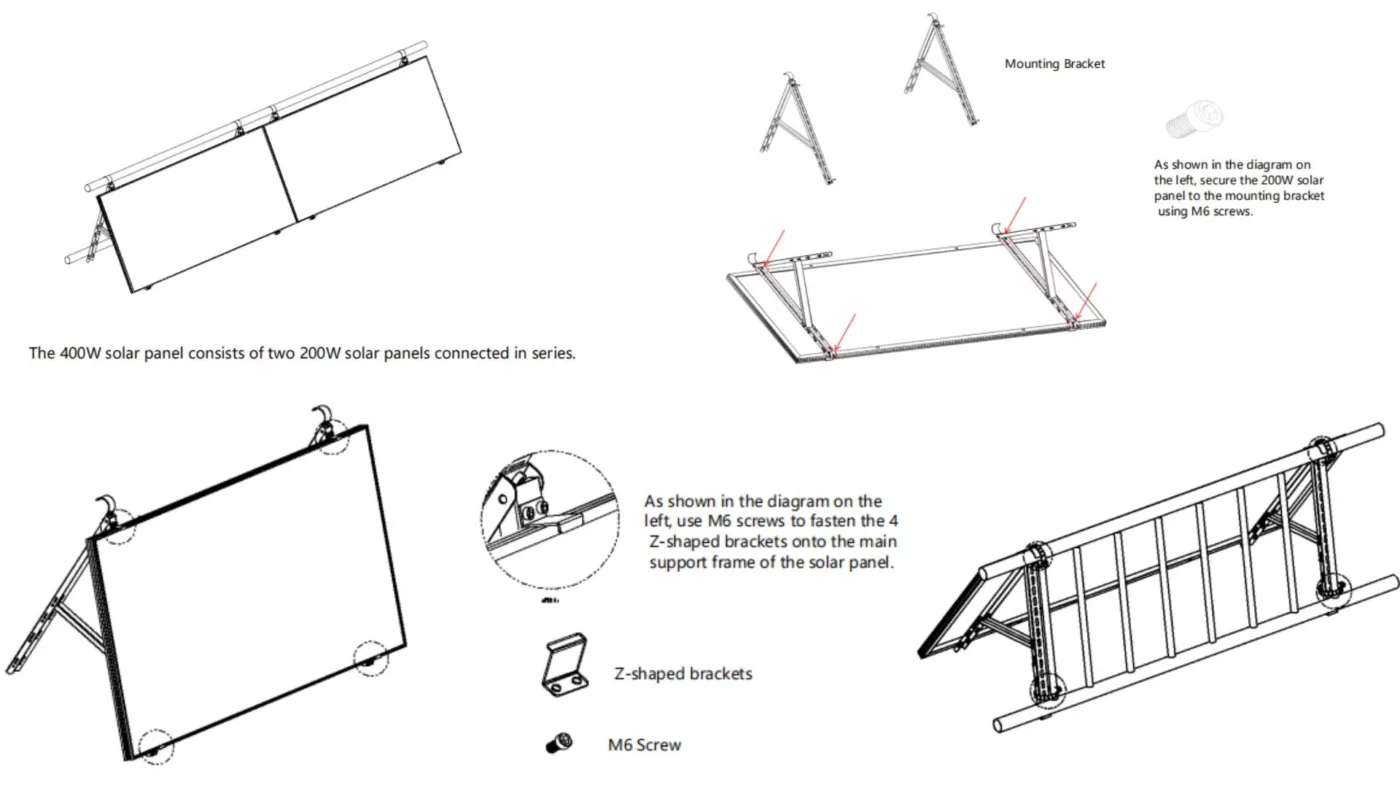
Take the 200W solar panels and secure them to the mounting bracket using M6 screws. Make sure the panels are tightly fastened to prevent any movement or instability.
5. Step 3: Installing the Z-Shaped Brackets
Next, attach the four Z-shaped brackets to the main support frame of each solar panel using M6 screws. These brackets will provide additional support and stability.
6. Step 4: Securing the Solar Panels to the Balcony Railing
Using clamps, securely fasten the solar panels, along with the installed support structure, to the balcony railing. Ensure that the panels are positioned at an optimal angle to receive maximum sunlight throughout the day.
7. Step 5: Connecting the Cables and Micro Inverter
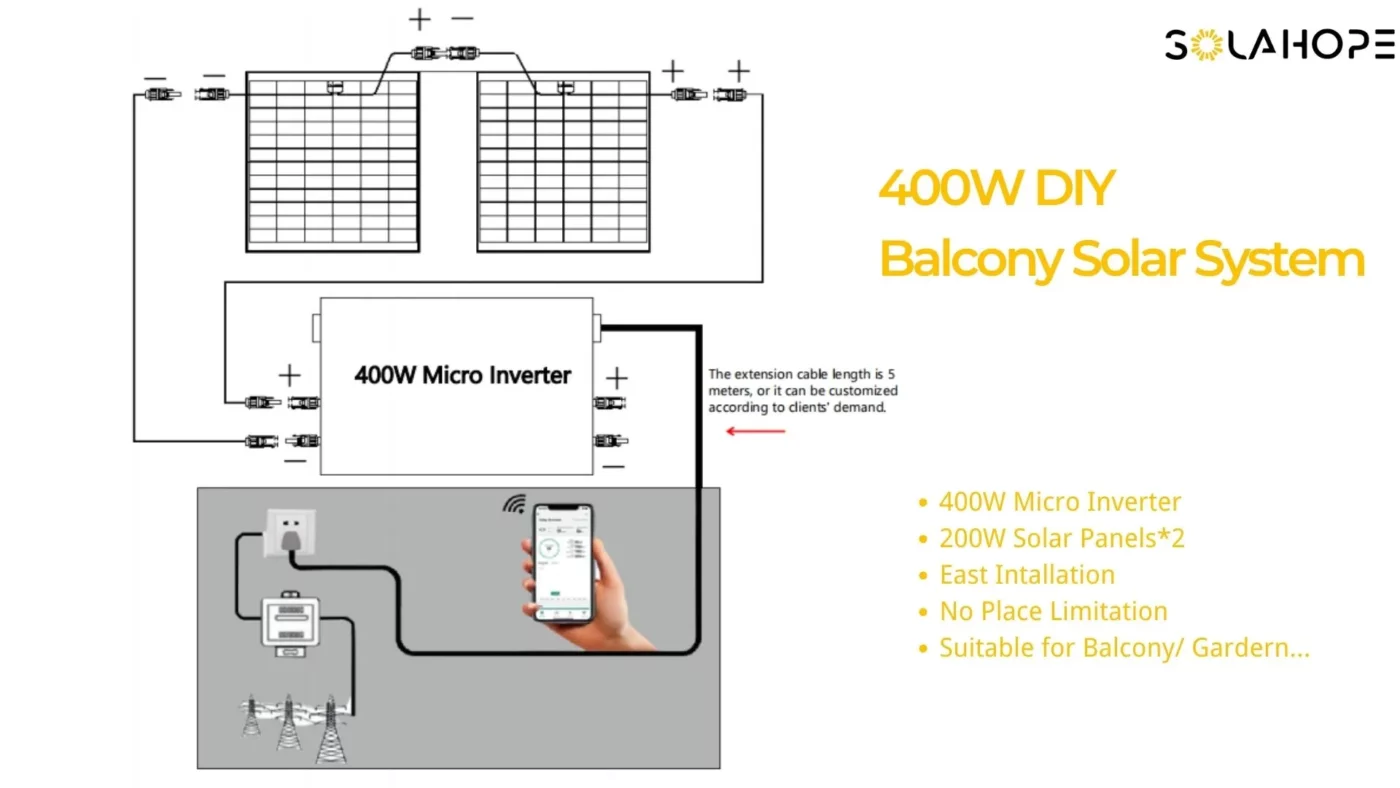
Now it’s time to connect the solar panels to the E400 micro inverter. Simply connect the cables from the solar panels to the corresponding ports on the micro inverter. Ensure that the connections are secure and free from any loose ends.
8. Step 6: Placing the Micro Inverter
Choose a suitable location to place the micro inverter. It should be somewhere accessible and well-ventilated to dissipate any heat generated during operation. Take into account the length of the cables when deciding on the placement.
9. Step 7: Finalizing the Balcony Solar System Installation
The final step is to plug the micro inverter into a wall socket. This will establish the connection to the electrical grid, allowing the excess energy generated by your solar panels to be fed back into the system. Congratulations! You have successfully installed a balcony solar system.
10. Conclusion
Installing a balcony solar system is an excellent way to embrace renewable energy and reduce your environmental impact. By following the simple steps outlined in this guide, you can harness the power of the sun and generate clean electricity right on your balcony. Not only will you save on energy costs, but you’ll also contribute to a greener and more sustainable future.
11. Frequently Asked Questions (FAQs)
Q1: Will a balcony solar system generate enough electricity to power my entire home?
A: While a balcony solar system can generate a significant amount of electricity, its capacity may not be sufficient to power an entire home. However, it can contribute to your overall energy needs and help reduce your reliance on the grid.
Q2: Can I install a balcony solar system if I live in a rented apartment? A: Before installing a balcony solar system, it’s essential to check with your landlord or property management to ensure that you have permission to make modifications to the balcony. Some landlords may have restrictions or guidelines in place.
Q3: How much maintenance does a balcony solar system require? A: Balcony solar systems generally require minimal maintenance. Regular cleaning of the solar panels to remove dust and debris is recommended. Additionally, it’s essential to check the system periodically for any signs of damage or loose connections.
Q4: Can I expand my balcony solar system in the future?
A: Yes, you can expand your balcony solar system by adding more solar panels and increasing the capacity of the micro inverter. It’s advisable to consult with a professional solar installer to ensure the system is correctly designed and configured.
Q5: Will installing a balcony solar system affect my electricity bills?
A: Installing a balcony solar system can significantly reduce your electricity bills. By generating your own electricity, you’ll be consuming less power from the grid, leading to potential savings over time.
In conclusion, installing a balcony solar system allows you to harness the power of the sun and contribute to a sustainable future. By following the step-by-step guide provided, you can set up your own balcony solar system and enjoy the benefits of clean and renewable energy. Start your journey towards energy independence today!
The installation video will be released soon. Please stay tuned!
Solahope 400w balcony solar system: https://www.technest.world/product/solar-system/


